A Beginner's Guide to Basic Animation in Flutter
Understanding the Power of Animation in User Interfaces

Hey there! I'm Pranav Masekar, a dedicated Flutter developer who's all about crafting captivating mobile apps that not only look stunning but also deliver unforgettable user experiences. But it doesn't stop there – I'm also a passionate blogger, sharing insights and best practices within the Flutter community. By contributing to the growth and knowledge-sharing of fellow developers, I'm committed to fostering a dynamic and collaborative environment. And let's not forget my DevOps journey – as a seasoned engineer, I've got the CI/CD pipelines, infrastructure-as-code, and cloud platforms down to an art.
Introduction
Animation is the secret ingredient that can transform a simple mobile app into a captivating and engaging experience for users. In the world of mobile app development, Flutter stands out as a powerful framework for building natively compiled applications. One of its standout features is its ability to seamlessly incorporate animations. Flutter's animation capabilities enable developers to breathe life into their user interfaces, making them dynamic, visually appealing, and interactive. In this blog series, we will embark on a journey into the realm of Flutter animation, exploring its potential and discovering how it can enhance the user experience of your mobile applications.
Prerequisites
Basic Flutter and Dart knowledge
Version Control
Creative mindset
Types of Animations
1. Implicit Animations
Implicit animations in Flutter are a way to create animations with minimal code and effort. They are designed to animate changes in widget properties automatically, without explicitly defining the animation steps. These animations are often used for simple transitions, such as fading, sliding, or resizing a widget in response to changes in its properties.
We don’t have much control over these implicit animations but they are very easy to use because most of the things are handled by Flutter framework by default.
2. Explicit Animation
Explicit animations, on the other hand, provide more control and flexibility when creating animations in Flutter. With explicit animations, you define the animation's behaviour explicitly, including the animation controller, animation curves, and intermediate states. This level of control is ideal for complex animations and custom transitions.
Explicit animations may be a bit tricky to get started with. These animations are very powerful in terms of control and user experience.
Let’s write some code 🧑💻
We are going to see two examples of Implicit animations in this blog. First, we will cover a very basic container animation and then we will create animation using Tweens. So let’s start with our first basic animation.
We are going to create a simple animation like this -
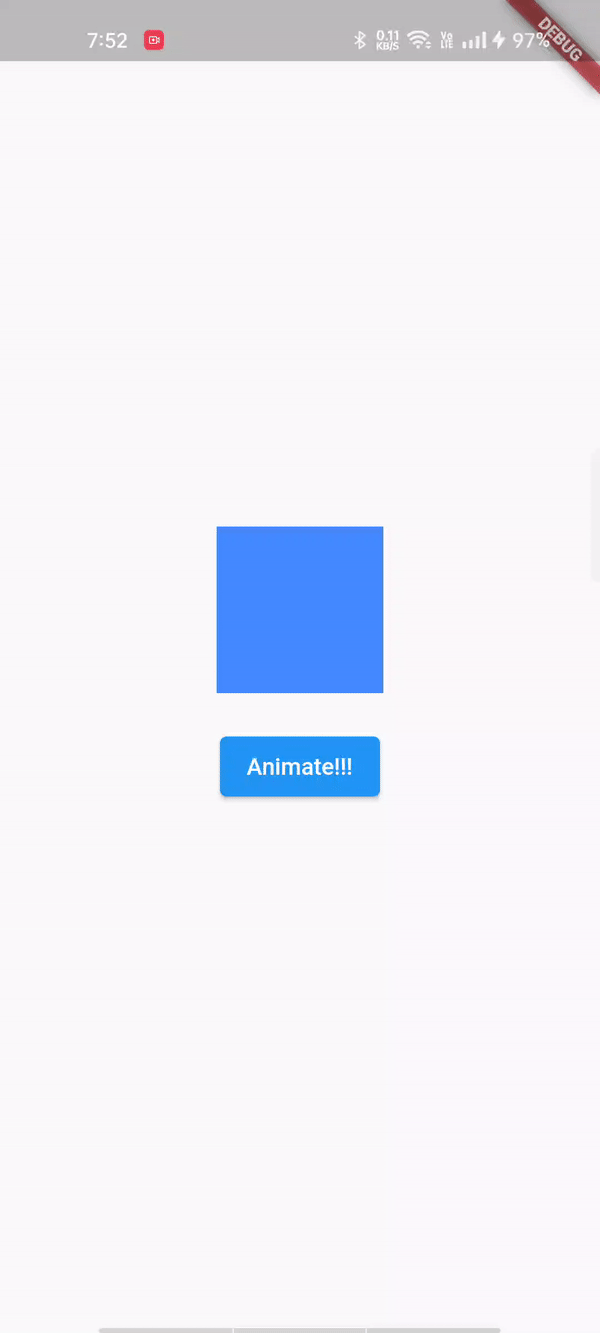
We know that we need to use a container to create a box at the centre of the screen. But how do we animate this ??
For such simpler animation flutter provides some animated widgets. In our case, we are going to use the AnimatedContainer widget to animate this container.
class HomeScreen extends StatefulWidget {
  const HomeScreen({Key? key}) : super(key: key);

  @override
  State<HomeScreen> createState() => _HomeScreenState();
}

class _HomeScreenState extends State<HomeScreen> {
  double height = 100;
  double width = 100;

  @override
  Widget build(BuildContext context) {
    return Scaffold(
      body: Center(
        child: Column(
          mainAxisAlignment: MainAxisAlignment.center,
          children: [
            AnimatedContainer(
              duration: const Duration(milliseconds: 500),
              height: height,
              width: width,
              color: Colors.blueAccent,
            ),
            const SizedBox(height: 20),
            ElevatedButton(
              onPressed: () {
                setState(() {
                  height = 200;
                  width = 200;
                });
              },
              child: const Text('Animate!!!'),
            ),
          ],
        ),
      ),
    );
  }
}
AnimatedContainer is the same as a normal Container widget but it also takes parameters of Duration. This duration specifies the time interval in which our animation should be completed. So as soon as the user clicks the button the size of the container is changed. This change is detected by AnimatedContainer widgets and forces them to animate the widget.
Curves determine how the animated property changes over time, affecting the acceleration and deceleration of the animation. Flutter provides many curves options you can check it out here.
It also shows the graph of how each curve works.
With such a minimum amount of code, we will be able to achieve the required animation. Of course, this is not super fancy animation but these are the basics of animation.
AnimatedContainer is just one of many widgets that we can use to create implicit animation in Flutter. Here is the entire list of widgets here.
In our second example of Implicit animation, we need to first understand what is a Tween and TweenAnimationBuilder.
What is Tween?
In Flutter animation, a tween is an abbreviation for "tweening function" or "in-betweening function." In essence, a tween takes the starting and ending values of an animation and calculates the intermediate values between them. Suppose we create a tween whose starting value is 0 and ending value is 10. Then tween helps us to create animation at each value i.e. 1,2,3,4. . . . 10.
What is TweenAnimationBuilder?
The TweenAnimationBuilder is a widget in Flutter that simplifies the process of creating animations using tweens. It allows you to smoothly animate a value from a start to an end value by specifying a Tween, a duration, and a builder function. The builder function is called for each frame of the animation, providing you with the current value of the tween, which you can use to update your UI.
Enough theory let’s hope on to some practical examples -
In our second example, we have to create this type of animation
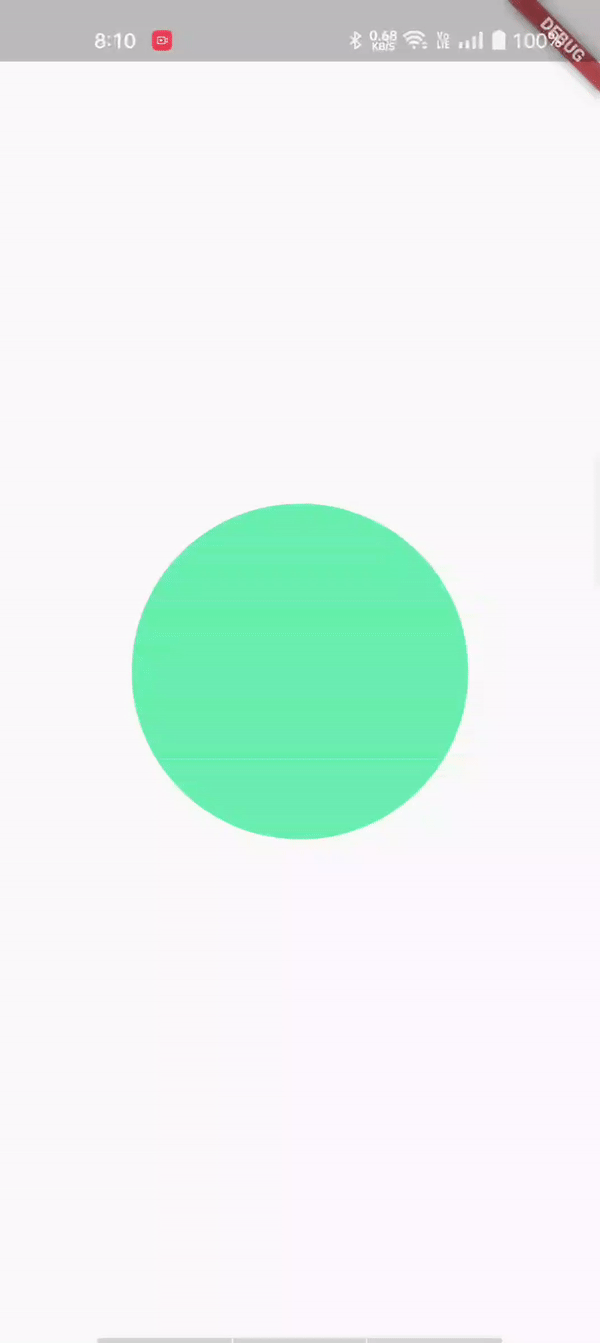
For this animation, we are going to use the concept of Tweens. As discussed previously Tweens should have a type. It should carry integer, double, color, etc any property. As shown in the video we want to change the size of the container so we are going to create a Tween of type double.
class HomeScreen extends StatefulWidget {
  const HomeScreen({Key? key}) : super(key: key);

  @override
  State<HomeScreen> createState() => _HomeScreenState();
}

class _HomeScreenState extends State<HomeScreen> {
  @override
  Widget build(BuildContext context) {
    return Scaffold(
      body: Center(
        child: Column(
          mainAxisAlignment: MainAxisAlignment.center,
          children: [
            TweenAnimationBuilder(
              tween: Tween<double>(begin: 0, end: 200),
              duration: const Duration(milliseconds: 800),
              curve: Curves.easeIn,
              builder: (context, value, child) {
                bool isCicle = value >= 100;
                return Container(
                  height: value,
                  width: value,
                  decoration: BoxDecoration(
                    color: isCicle ? Colors.greenAccent : Colors.blueAccent,
                    shape: BoxShape.circle,
                  ),
                );
              },
            ),
          ],
        ),
      ),
    );
  }
}
TweenAnimationBuilder will automatically rebuild the UI as the value of Tween changes until it reaches the end. One more thing to notice is the arguments in the builder function.
We talked about tween and value but what is this child parameter?
Our builder function is called whenever the value of the tween changes. Suppose we have a text at the centre of the container then this text will also get rebuilt whenever tween updates its value. Of course this isn’t very good practice to rebuild the UI unnecessarily. That’s where the child property helps us. Whatever you pass in the child property will not get rebuilt in Tween Animation. This helps us to increase the performance of our application and animation.
TweenAnimationBuilder(
    tween: Tween<double>(begin: 0, end: 200),
    duration: const Duration(milliseconds: 800),
    curve: Curves.easeIn,
    builder: (context, value, child) {
       bool isCicle = value >= 100;
       return Container(
       height: value,
       width: value,
       decoration: BoxDecoration(
           color: isCicle ? Colors.greenAccent : Colors.blueAccent,
           shape: BoxShape.circle,
         ),
         child: child,
       );
    },
    child: const Center(child: Text('Hello World!')),
),
Congratulations on mastering Flutter animation, where creativity meets seamless user experiences. Your journey into creating captivating mobile apps is just beginning!
Happy Fluttering 💙💙💙


