Securing Flutter APKs: From Concept to Implementation
A Step-by-Step Tutorial on APK Signing in Flutter


Introduction
In the fast-evolving landscape of mobile application development, crafting visually stunning and user-friendly apps is only one part of the equation. Ensuring that your Flutter app's integrity remains intact, even after it leaves your development environment, is equally crucial. This is where the concept of APK signing steps into the spotlight. In this comprehensive guide, we will embark on a journey through the intricate world of APK signing.
APK Signature
In the world of Flutter app development, signing an APK (Android Application Package) is a crucial process that involves digitally sealing your Android application with a unique cryptographic signature. This signature serves as a digital fingerprint, and its primary purpose is to verify the authenticity and integrity of your app.
The importance of signing your Flutter APK becomes evident when you consider the security implications. By digitally signing your app, you're not only assuring users of its authenticity but also protecting it against unauthorized modifications. If someone were to tamper with your app's code or resources, the signature check would fail, and the altered version wouldn't be installed, safeguarding users from potential harm.
Steps to Flutter APK
Step 1: Generate Keystore
First, open the terminal in the root directory of the Flutter application and run the following command -
For Linux and Mac Users -
  keytool -genkey -v -keystore ~/upload-keystore.jks -keyalg RSA \
          -keysize 2048 -validity 10000 -alias upload
For Windows Users -
  keytool -genkey -v -keystore %userprofile%\upload-keystore.jks ^
          -storetype JKS -keyalg RSA -keysize 2048 -validity 10000 ^
          -alias upload
The command will ask for a password so input any password according to you for our blog we are going to use android as a password but feel free to change it to anything.
Also, you can input the other optional fields like name and organization and enter yes to create the file.
This will create upload-keystore.jks file and its location will be printed in the last of the command output.
Note: This keystore file is private so don't include this file in any source code management tool like Git.
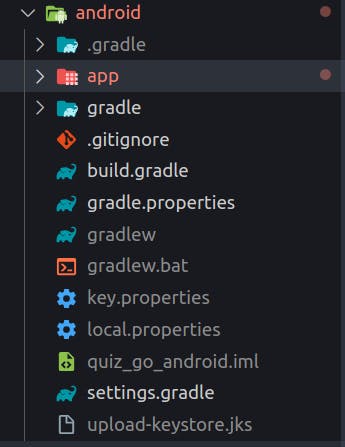
Add this upload-keystore.jks file into the Android folder. So the path should be like this -
Step 2: Create a key.properties file
The second step is to create key.properties inside your Android folder.
After creating the file add this to the file -
storePassword=android
keyPassword=android
keyAlias=upload
storeFile=../upload-keystore.jks
Note: Make sure to add the same password entered in the previous step.
Step 3: Updating build.gradle file
Open up the build.gradle file inside the android/app folder.
First, add these lines just before starting of android tag -
def keystoreProperties = new Properties()
def keystorePropertiesFile = rootProject.file('key.properties')
  if (keystorePropertiesFile.exists()) {
     keystoreProperties.load(new FileInputStream(keystorePropertiesFile))
  }

android {
    ...
}
Now replace this block of code -
buildTypes {
    release {
        // TODO: Add your own signing config for the release build.
        // Signing with the debug keys for now,
        // so `flutter run --release` works.
        signingConfig signingConfigs.debug
    }
}
with this -
signingConfigs {
       release {
           keyAlias keystoreProperties['keyAlias']
           keyPassword keystoreProperties['keyPassword']
           storeFile keystoreProperties['storeFile'] ? file(keystoreProperties['storeFile']) : null
           storePassword keystoreProperties['storePassword']
       }
   }

   buildTypes {
       release {
           signingConfig signingConfigs.release
       }
   }
Step 3: Build APK
Currently, we have completed the setup of signing the Flutter app but just to avoid any unnecessary errors run the following commands -
flutter clean
flutter pub get
flutter build apk --release

With this, we have successfully signed our Flutter application. One thing to mention if you are using CI/CD options like Codemagic you need to upload the keystore file that we created to authenticate and create an abb or apk file.
That's it for this blog make sure to like and share the blog if you find it helpful and also subscribe to my newsletter.
Keep Fluttering 💙💙💙