Infrastructure as Code with Terraform
Provision AWS infrastructure using Terraform

Hey there! I'm Pranav Masekar, a dedicated Flutter developer who's all about crafting captivating mobile apps that not only look stunning but also deliver unforgettable user experiences. But it doesn't stop there – I'm also a passionate blogger, sharing insights and best practices within the Flutter community. By contributing to the growth and knowledge-sharing of fellow developers, I'm committed to fostering a dynamic and collaborative environment. And let's not forget my DevOps journey – as a seasoned engineer, I've got the CI/CD pipelines, infrastructure-as-code, and cloud platforms down to an art.
Provisioning infrastructure can be a time-consuming and complex process for IT teams. Traditional methods of manually setting up servers and configuring applications can lead to errors, inconsistencies, and a lack of scalability. However, with the rise of Infrastructure as Code (IaC) tools like Terraform, automating the process of provisioning infrastructure has become easier and more efficient than ever before.
Terraform is an open-source tool that enables users to define and manage infrastructure as code using a high-level configuration language. It allows you to provision and manage infrastructure resources across multiple cloud providers and on-premises data centers, ensuring consistency and reducing the chances of errors in the process.
In this blog, we will dive deeper into Terraform and how it can be used to provision infrastructure. We will explore the benefits of using Terraform for infrastructure provisioning, the key concepts of Terraform, and walk through a simple example of using Terraform to provision infrastructure on AWS. By the end of this blog, you will have a solid understanding of Terraform and how it can be used to streamline your infrastructure provisioning process.
Prerequisites -
AWS account
Terraform installed on the local system
Docker Image
In this article, we are going to create a simple AWS infrastructure using Terraform and deploy a simple application.
We are going to use docker to run our application on AWS-provisioned infrastructure.
To install Terraform on the local system follow this LINK.
If you don’t know how to create a Docker image then follow this LINK.
Now let’s start with our implementation -
Create a main.tf file in your project folder
provider "aws" {
  region = "ap-south-1"
}

variable "vpc-cidr-block" {}
variable "subnet-cidr-block" {}
variable "availability_zone" {}
variable "env_prefix" {}
variable "ip-address" {}
variable "instance-type" {}
variable "public-key-path" {}
variable "private-key-path" {}

resource "aws_vpc" "myapp-vpc" {
  cidr_block = var.vpc-cidr-block
  tags = {
    Name = "${var.env_prefix}-vpc"
  }
}

resource "aws_subnet" "myapp-subnet-1" {
  vpc_id            = aws_vpc.myapp-vpc.id
  cidr_block        = var.subnet-cidr-block
  availability_zone = var.availability_zone
  tags = {
    Name = "${var.env_prefix}-subnet-1"
  }
}

resource "aws_internet_gateway" "myapp-internet-gateway" {
  vpc_id = aws_vpc.myapp-vpc.id
  tags = {
    Name = "${var.env_prefix}-internet-gateway"
  }
}

resource "aws_default_route_table" "main-route-table" {
  default_route_table_id = aws_vpc.myapp-vpc.default_route_table_id
  route {
    cidr_block = "0.0.0.0/0"
    gateway_id = aws_internet_gateway.myapp-internet-gateway.id
  }
  tags = {
    Name = "${var.env_prefix}-main-route-table"
  }
}

resource "aws_security_group" "myapp-security-group" {
  name   = "myapp-security-group"
  vpc_id = aws_vpc.myapp-vpc.id

  ingress {
    from_port   = 22
    to_port     = 22
    protocol    = "tcp"
    cidr_blocks = [var.ip-address]
  }

  ingress {
    from_port   = 8000
    to_port     = 8000
    protocol    = "tcp"
    cidr_blocks = ["0.0.0.0/0"]
  }

  egress {
    from_port       = 0
    to_port         = 0
    protocol        = "-1"
    cidr_blocks     = ["0.0.0.0/0"]
    prefix_list_ids = []
  }

  tags = {
    Name = "${var.env_prefix}-security-group"
  }
}

data "aws_ami" "ubuntu" {
  most_recent = true
  owners      = ["099720109477"]
  filter {
    name   = "name"
    values = ["ubuntu/images/hvm-ssd/ubuntu-focal-20.04-amd64-server-*"]
  }
  filter {
    name   = "virtualization-type"
    values = ["hvm"]
  }
}

output "aws-ami-id" {
  value = data.aws_ami.ubuntu.id
}

output "ec-2-public-ip" {
  value = aws_instance.myapp-server.public_ip
}

resource "aws_key_pair" "ssh-key" {
  key_name   = "server-key"
  public_key = file(var.public-key-path)
}

resource "aws_instance" "myapp-server" {
  ami           = data.aws_ami.ubuntu.id
  instance_type = var.instance-type

  subnet_id                   = aws_subnet.myapp-subnet-1.id
  vpc_security_group_ids      = [aws_security_group.myapp-security-group.id]
  availability_zone           = var.availability_zone
  associate_public_ip_address = true
  key_name                    = aws_key_pair.ssh-key.key_name

  user_data = file("entry-script.sh")

  tags = {
    Name = "${var.env_prefix}-EC-2-server"
  }
}
Let’s look at our main.tf file -
provider - This defines which cloud provider we are using for infrastructure. Terraform supports most cloud providers so we need to define which one we are using.
variable - Variables in terraform are the same as variables in a programming language.
resource - Terraform uses resource blocks to define infrastructure resources, and each block specifies the resource type, its name, and its configuration.
output - We use the output block to output values from terraform commands in the command line.
data - A data source is a block of code that defines where to get the data and how to format it so that Terraform can use it.
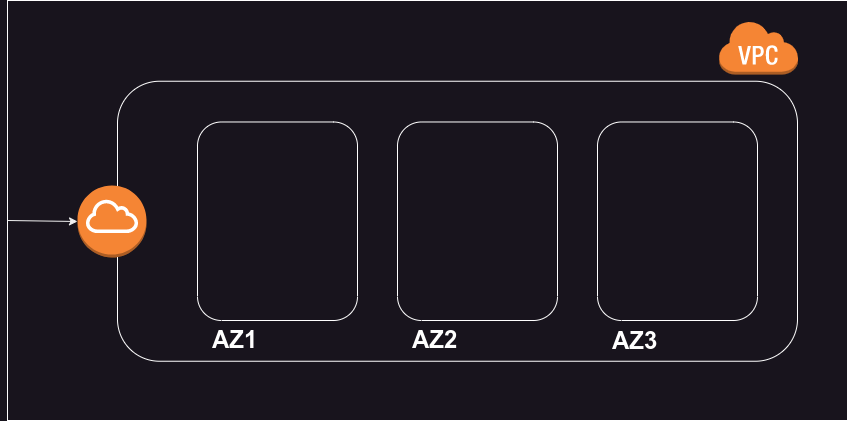
In any cloud provider to provision infrastructure, we need to first create a VPC i.e. virtual private cloud as shown in the above figure. A VPC contains many availability zones. In which we can provision our infrastructure. In these availability zones, we create subnets. A subnet is a range of IP addresses in a Virtual Private Cloud (VPC).
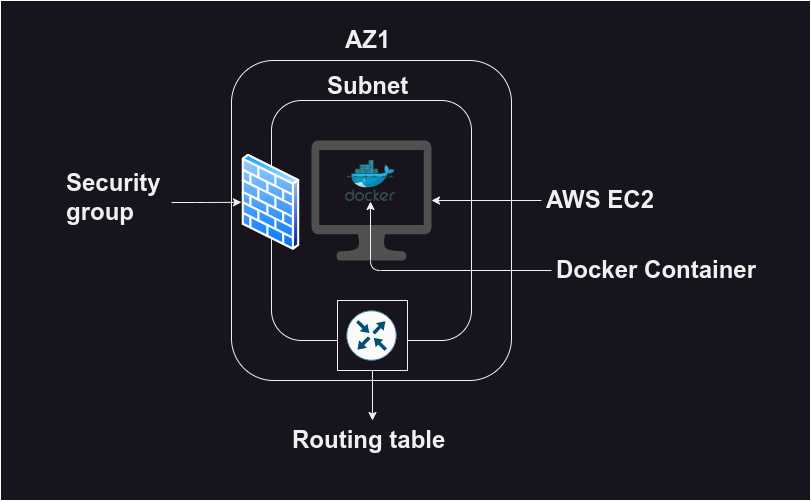
Then inside the subnet, we provision our EC2 instances from AWS. Besides from EC2 instance subnet is associated with the below things as well -
Security Group
Routing Table
Security group allows us to define rules which describe which traffic is allowed to our application. A routing table is a set of rules that determine how network traffic is directed within a Virtual Private Cloud (VPC).
So let’s understand when and how we are creating these resources in our Terraform file.
The beauty of Terraform is ‘Terraform automatically creates a plan. This plan describes in which order these resources will be created.’ This is called the Declarative approach.
So let’s first take a look at which variables are we using
vpc-cidr-block - CIDR block defines the range of IP addresses that can be handled in one VPC.
availability_zone - This defines one of the availability zones in your region.
env_prefix - This is used to identify environment types like Dev, Development, Production, etc.
ip-address - This holds the IP address of your local system. We need to have your IP address to SSH into an EC2 instance.
instance-type - Represents the type of EC2 instance that we create in our case it’s t2.micro.
public-key-path & private-key-path - This stores the path to your SSH keys.
Now let’s understand the actual provisioning code.
Every resource in AWS takes two input parameters one is a type of resource and the second is the name of the resource.
aws_vpc - This represents AWS VPC resource, it takes many attributes in the parameter but we are only setting cidr block and tags. Tags are like metadata that will occur in your AWS console.
aws_subnet - As the name suggests this is an AWS Subnet resource. We define major three attributes here
VPC ID - Defines which VPC it belongs to
CIDR Block - Range of IP addresses
Availability Zone - One of the availability zones
aws_internet_gateway - When you create a VPC in AWS, it is by default private, meaning that instances in the VPC can communicate with each other, but they cannot communicate with the internet. To enable internet connectivity, you need to attach an Internet Gateway to the VPC.
aws_default_route_table - Whenever a VPC is created a default route table is also created. But this route table only contains private routes. We need to add a route that allows traffic from all IP addresses. For that reason, we add a route and 0.0.0.0/0 represents allowed from everywhere.
aws_security_group - The security group is used to create rules for accessing our subnets. Ingress defines rules for incoming traffic and egress defines rules for outgoing traffic. For Ingress, we open up port 22 as it is the default port for SSH, also we open up port 8000 for our application.
aws_ami - To create an EC2 instance we need to find the first appropriate AMI for it. So we are going to use the Ubuntu image for our application. For that, we define some filters - LINK
owners - Which represent the actual owner of the image
filter - This tag is used to filter out our desired image so for that, we write a regular expression. We also define virtualization types.

aws_key_pair - AWS Key Pair is a security credential used to securely connect and authenticate to EC2 instances or other AWS resources. We store our public key on our EC2 instance and use the private key to connect via SSH.
aws_instance - This is where we provision our EC2 instance. We give input of our AMI which we provisioned previously. Provide subnet and VPC ids. We set associate_public_ip_address to true to get a public IP address.
key_name defines the name of the SSH public key defined in the aws_key_pair resource. user_data attribute allows us to run a script file when EC2 is fully prepared. We will use this to run our application.
Finally, we output the aws_ami_id and ec-2-public-ip from the command line.
Now let’s define our variables so create terraform-dev.tfvars file
vpc-cidr-block = "10.0.0.0/16"
subnet-cidr-block = "10.0.10.0/24"
availability_zone = "ap-south-1a"
env_prefix = "dev"
ip-address = "103.121.69.18/32" #! 32 is used to only allow one id address
instance-type = "t2.micro"
public-key-path = "/home/pranav-masekar/.ssh/id_rsa.pub"
private-key-path = "/home/pranav-masekar/.ssh/id_rsa"
Let’s create our script file as well
#!/bin/bash
sudo yum update -y && sudo yum install -y docker
sudo systemctl start docker
sudo usermod -aG docker ec2-user
docker run -p 8000:8000 pranav18vk/go-restro:latest
Let’s first initialize our terraform file using
terraform init
Now let’s create a terraform plan using
terraform plan -var-file=terraform-dev.tfvars
This will create a plan and will output resources that will be created after terraform apply.
So let’s apply our changes
terraform apply -var-file terraform-dev.tfvars -auto-approve
This will create your infrastructure and the public IP address of the EC2 instance will be displayed in the console. To access the application inside an EC2 instance grab the public IP address and extend it with a port number i.e. 8000 in our case.
Congratulations 🎉 🎉 You have successfully provisioned AWS infrastructure using Terraform and deployed a sample application on it.


