Elevate Your Flutter Game with Unit Testing
Understanding the Fundamentals for Testing Success

Hey there! I'm Pranav Masekar, a dedicated Flutter developer who's all about crafting captivating mobile apps that not only look stunning but also deliver unforgettable user experiences. But it doesn't stop there – I'm also a passionate blogger, sharing insights and best practices within the Flutter community. By contributing to the growth and knowledge-sharing of fellow developers, I'm committed to fostering a dynamic and collaborative environment. And let's not forget my DevOps journey – as a seasoned engineer, I've got the CI/CD pipelines, infrastructure-as-code, and cloud platforms down to an art.
Introduction
We all get it – testing in coding seems like a speed bump. It's that thing we know we should do but often skip. Especially in Flutter and Dart, testing gets a bad rap for slowing us down. But what if I said testing could actually make things easier? Imagine if it's not a hassle but a helpful friend in making your code solid. In this blog, we will explore why testing in Flutter isn't the roadblock we think it is and how testing can be a game changer in the long run of the application.
What is Unit Testing?
Imagine you're building a cool app with Flutter. Now, unit testing is like having a buddy who checks small pieces of your code to make sure they work as expected. Instead of waiting until the whole app is done to find mistakes, your buddy helps catch little problems early on. It's like making sure each ingredient in your recipe tastes good before you cook the whole dish.
So, in Flutter, unit testing is this super useful tool that helps you build a reliable app by checking if each part does its job correctly, making your development journey smoother. Unit tests will check every function in the application and ensure that it works perfectly.
Now that we have understood what unit testing is, let’s see some code samples to know how they work in code exactly.
Before starting, ensure that your Flutter project has following in the dev dependencies.
dev_dependencies:
  flutter_test:
    sdk: flutter
Now let’s see a simple example of Unit tests -
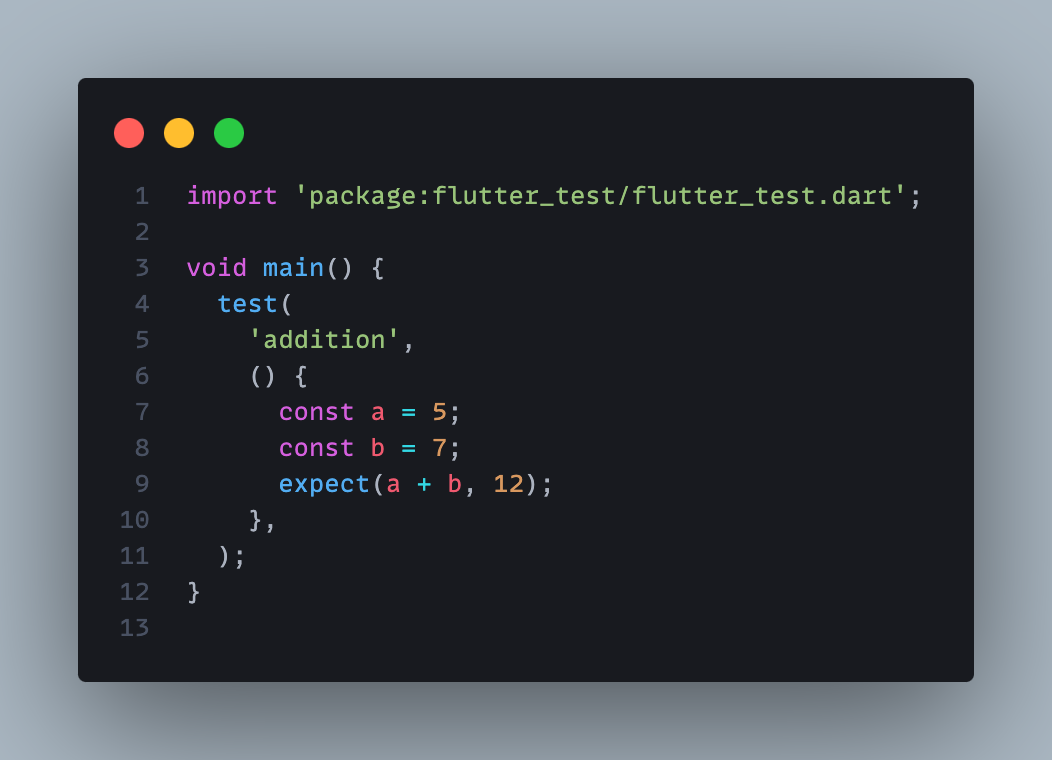
flutter_test.dart imports the flutter_test library which contains utilities for writing widget and unit tests in Flutter.
The main() function is the entry point for a Dart program. All tests will be inside this main() function.
The test() function is used to define a single test case. The first argument is the name of the test. The second argument is an anonymous function that contains the actual test assertions and logic.
The expect() function provided by the test package is used for assertions. It will verify that a + b equals 12. If this assertion fails, the test will fail.
We can run the tests in flutter by using following command -
flutter test
That’s it 🥳🥳🥳
You have written your first Unit Test in Flutter.
Now let’s try to write unit tests for some real world scenarios.
I am going to use one of my projects for the blog but you can follow along and experiment on your projects.
Here’s the link - https://github.com/PranavMasekar/QuizGo
Now we are going to write unit tests for our UserModel class.
class UserModel {
  UserModel({
    required this.email,
    required this.userName,
  });

  factory UserModel.fromMap(Map<String, dynamic> map) {
    return UserModel(
      email: map['email'] as String,
      userName: map['userName'] as String,
    );
  }
  final String email;
  final String userName;

  UserModel copyWith({
    String? email,
    String? userName,
  }) {
    return UserModel(
      email: email ?? this.email,
      userName: userName ?? this.userName,
    );
  }

  Map<String, dynamic> toMap() {
    return <String, dynamic>{
      'email': email,
      'userName': userName,
    };
  }

  @override
  String toString() => 'UserModel(email: $email, userName: $userName)';

  @override
  bool operator ==(covariant UserModel other) {
    if (identical(this, other)) return true;

    return other.email == email && other.userName == userName;
  }

  @override
  int get hashCode => email.hashCode ^ userName.hashCode;
}
Here’s the unit test file -
import 'package:flutter_test/flutter_test.dart';
import 'package:quiz_go/models/user_model.dart';

void main() {
  final user = UserModel(email: 'someone@gmail.com', userName: 'Someone');
  final userMap = {
    'email': 'someone@gmail.com',
    'userName': 'Someone',
  };

  group(
    'UserModel -',
    () {
      test(
        'should return a valid UserModel instance when the map is valid',
        () {
          expect(UserModel.fromMap(userMap), user);
        },
      );

      test(
        'should return a valid map when the UserModel instance is valid',
        () {
          expect(user.toMap(), userMap);
        },
      );

      test(
        'should return a valid UserModel instance when the copyWith method is called',
        () {
          final expectedUser =
              UserModel(email: 'someone1@gmail.com', userName: 'Someone');
          expect(user.copyWith(email: 'someone1@gmail.com'), expectedUser);
        },
      );
    },
  );
}
First we create some variables which we will use repetitively in the test cases. This contains a UserModal instance and a Map object.
Group is used to combine related test cases for our readability. It contains a description and anonymous function.
Test Case 1 :
Check if we get a proper UserModel when we create it from a valid map. We use our created variables like user and usermap to evaluate the test cases.
Test Case 2 :
Ensure that we get a valid map when converting a UserModel instance to map.
Test Case 3 :
Validate that the copyWith method in UserModel produces the expected results. Ensuring that only mentioned fields are changing the values and rest of the data remains as it is.
And there you have it!
Unit testing ensures every part of your code works seamlessly together, just like ingredients in a perfect dish. So, next time you hesitate to test, remember, it's the secret ingredient for code that's not just good but outstanding.
Happy Fluttering 💙💙💙


