Mastering Advanced Flutter BLoC Techniques
Unlocking the Full Potential of BLoC
Introduction -
Welcome back, fellow Flutter enthusiasts! If you've been following my journey in the world of Flutter, you may recall our earlier exploration of the basics in my previous BLoC series. If you're just joining us make sure to read our Flutter Bloc series first. Today, we're embarking on an exciting new chapter as we delve into the advanced topics of Flutter BLoC.
Get ready to unlock the true potential of BLoC architecture as we explore cutting-edge techniques, tackle complex state management scenarios, and craft Flutter apps that are both powerful and elegant. Let's dive in!
Prerequisites -
Basic Flutter Knowledge
Understanding of BLoC
OOPS Concepts
1. One State Bloc
The BLoC (Business Logic Component) pattern has become popular for managing state in Flutter apps by separating business logic from the UI layer. But BLoC patterns come with a lot of boilerplate code and a lot of code duplication. Every bloc implementation requires a set of state classes to be defined and used in the UI accordingly.
Most of the time developers use the same kind of state classes for the BLoC. This code repetition leads to a large size of the codebase and makes it harder to manage on scale. One state-class solution aims to resolve all these issues regarding the BLoC. I have already written an article on using one state class in Flutter bloc here. But in summary, we use enums and copy with methods to reduce the boilerplate to a certain level.
part of 'auth_bloc.dart';

enum AuthStatus {
  initial,
  loading,
  error,
  login,
  signup,
}

class AuthState extends Equatable {
  const AuthState({required this.status, this.errorMessage = ''});
  final AuthStatus status;
  final String errorMessage;

  static AuthState initial() => const AuthState(status: AuthStatus.initial);

  AuthState copyWith({AuthStatus? status, String? errorMessage}) => AuthState(
        status: status ?? this.status,
        errorMessage: errorMessage ?? this.errorMessage,
      );

  @override
  List<Object> get props => [status.name, errorMessage];
}
2. Bloc Observer
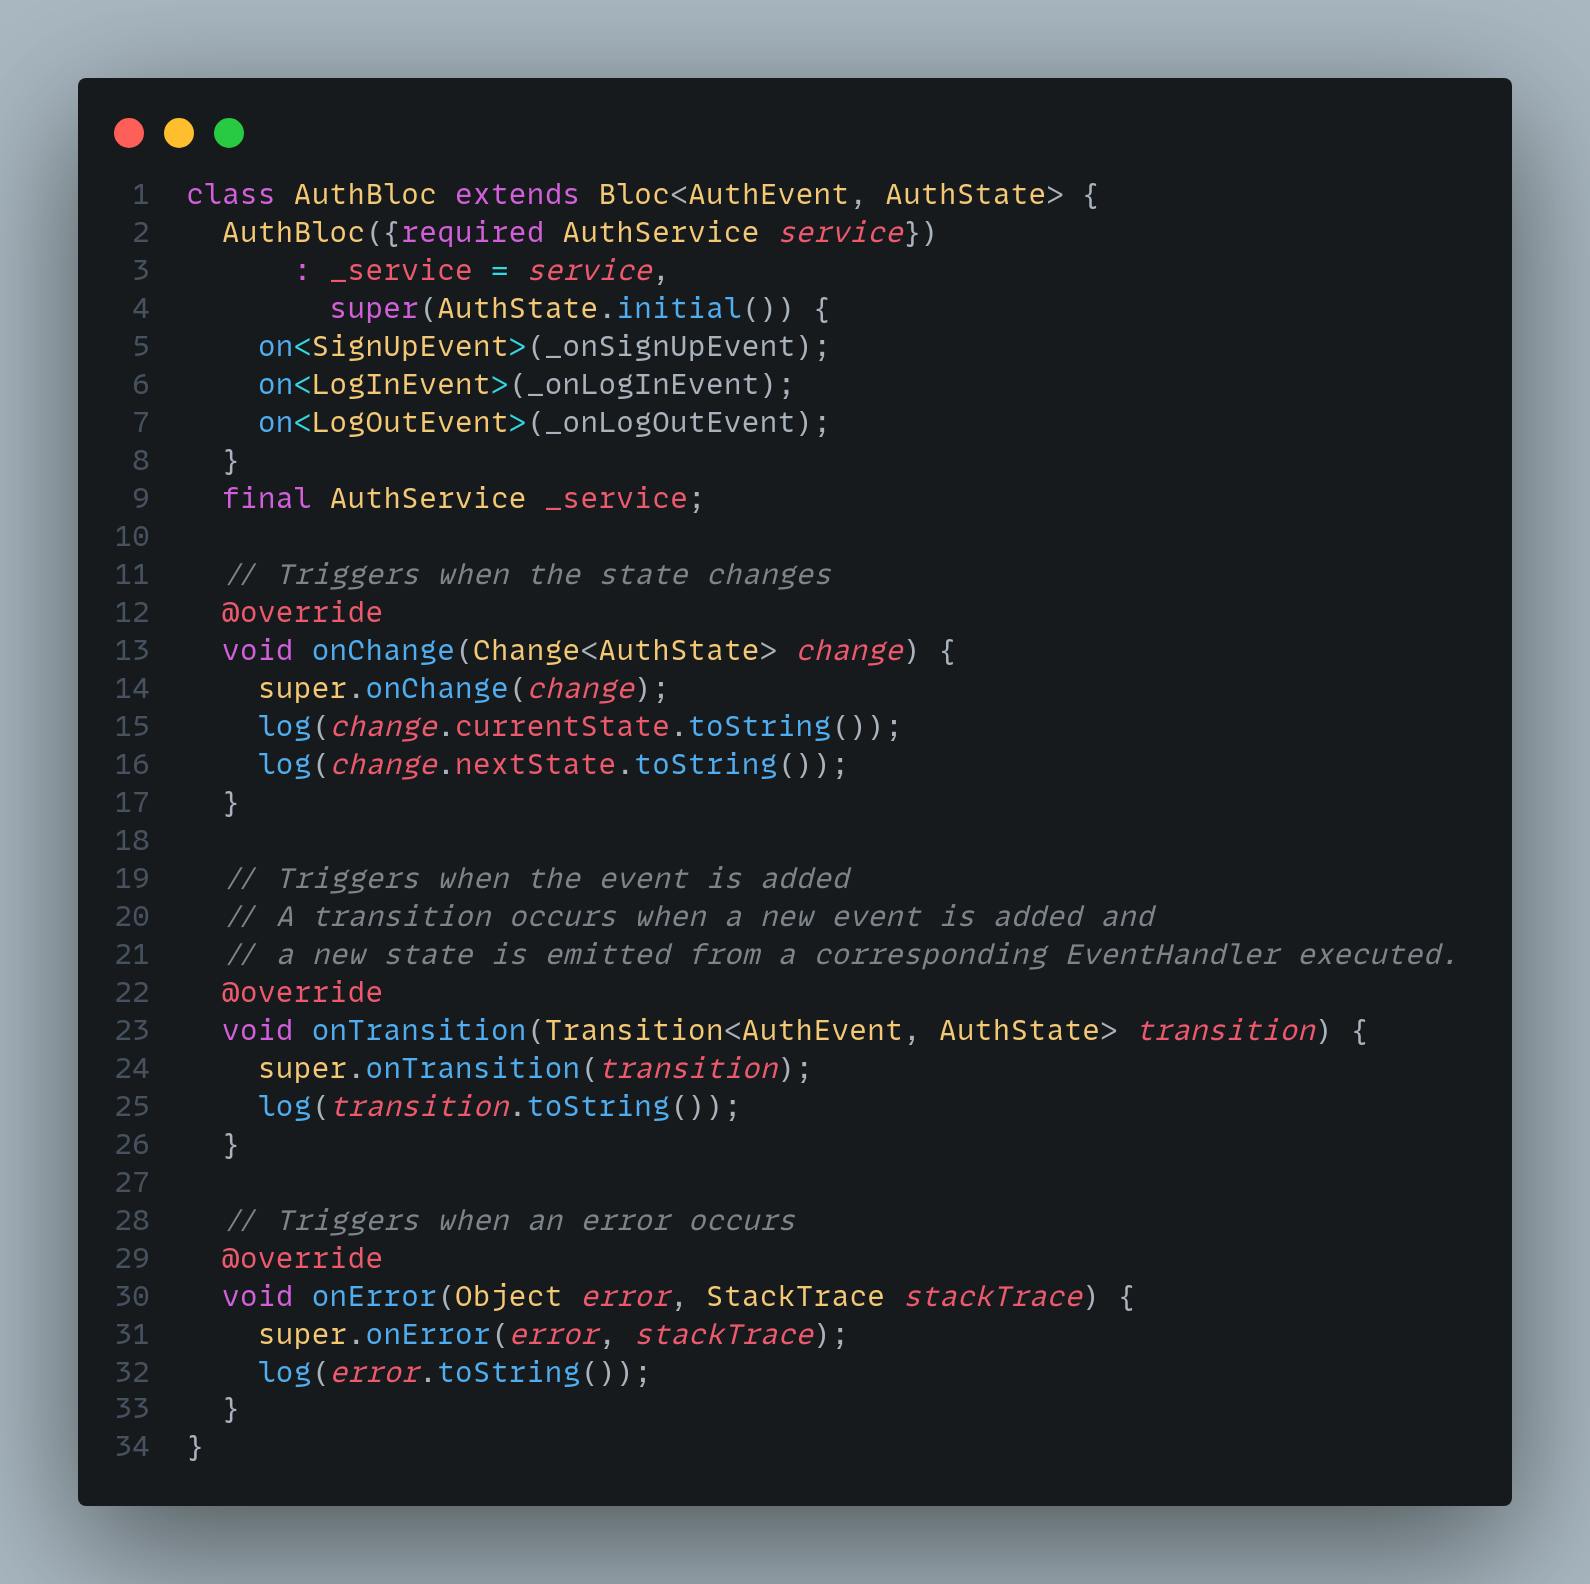
Imagine having a special tool that keeps an eye on everything your BLoC does. Well, that's what BlocObserver is! It's like having a detective for your BLoC. Whenever something important happens, like an event being used or a state being shown, BlocObserver is there to notice and report it. This is super useful, especially when you're trying to figure out what's happening inside your BLoC during debugging. It's like having a secret weapon in your Flutter toolkit!
Here’s how we can implement this for a single bloc -

But this is not a good solution if we want to set a watch on every Bloc. For that we create BlocObserver -

We need to specify this observer before running our application so add this in main.dart file -
Future<void> main() async {
  WidgetsFlutterBinding.ensureInitialized();
  Bloc.observer = MyBlocObserver();
  runApp(const MyApp());
}
3. Bloc Select
When it comes to Flutter BLoC, there's one advanced method that often gets overshadowed by its more prominent counterparts: bloc.select. While it's a fundamental tool in your BLoC toolkit, it's surprising how frequently developers forget to utilize this powerful feature.
bloc.select is a function in the Flutter BLoC library that allows you to select a value from a list of options based on the current state of a BLoC and rebuilds the UI when that value changes. This can be very useful to watch particular state objects like AuthState to check whether it's updated or not.
Example -
class MyWidget extends StatelessWidget {
  @override
  Widget build(BuildContext context) {
    final authBloc = BlocProvider.of<AuthBloc>(context);
    // Select the user object from the AuthState class.
    final user = authBloc.select((state) => state.user);
    return Scaffold();
  }
}
4. Bloc Transformers
A Bloc transformer in Flutter BLoC is a function that can be used to modify the stream of events that are emitted by a Bloc before they are processed by the Bloc's event handlers. Transformers can be used to achieve a variety of goals, such as debouncing events, dropping duplicate events, queuing events, combining events, and logging events. While implementing a transformer in bloc can be a bit more tricky so for that we use the bloc_concurrency package.

This package provides us with four transformers -
Concurrent - Process incoming event of bloc concurrently
Sequential - Process incoming events one after another
Droppable - Drops the incoming events if one event is being processed
Restartable - Process the latest incoming event and stop the execution of the ongoing event
class MyBloc extends Bloc<MyEvent, MyState> {
  MyBloc() : super(MyState()) {
    on<MyEvent>(
      (event, emit) {
        // ...
      },
      transformer: sequential(),
    );
  }
}
5. Hydrated Bloc
Hydrated Bloc is an extension of the Flutter BLoC library that provides a simple and efficient way to persist and restore application state across app restarts. It can be used with any type of Bloc, including Cubits, BloCs with multiple event handlers, and BloCs with multiple states. To use hydrated bloc in your flutter application we need to install the hydrated_bloc package and path_provider package to get the local directories.
Edit your main.dart file -

While creating bloc we need to create HydratedBloc instead of Bloc. We also need to override two methods that help to store and retrieve the data from local storage.

And that wraps up our journey into advanced Flutter BLoC techniques! Congratulations on making it this far - you now have some powerful new tools in your toolkit to build reactive, robust apps using the BLoC pattern. From leveraging transformers to persisting state with HydratedBloc, you're ready to take your BLoC skills to the next level. I hope you found these techniques useful! Be sure to like and leave a comment to let me know your biggest takeaways. And stay tuned for more Flutter content soon.
Keep Fluttering 💙💙💙