Automating Your CI/CD Workflow with Jenkins and GitHub Webhooks
How to Set Up a Jenkins Job to Automatically Build and Deploy on GitHub Push Events

Hey there! I'm Pranav Masekar, a dedicated Flutter developer who's all about crafting captivating mobile apps that not only look stunning but also deliver unforgettable user experiences. But it doesn't stop there – I'm also a passionate blogger, sharing insights and best practices within the Flutter community. By contributing to the growth and knowledge-sharing of fellow developers, I'm committed to fostering a dynamic and collaborative environment. And let's not forget my DevOps journey – as a seasoned engineer, I've got the CI/CD pipelines, infrastructure-as-code, and cloud platforms down to an art.
As software development teams grow, so does the need for reliable and efficient continuous integration and deployment (CI/CD) workflows. Jenkins is a popular tool for automating the building, testing, and deployment of software projects. GitHub, on the other hand, is a widely used platform for hosting and managing source code repositories. Combining Jenkins with GitHub Webhooks can help streamline your CI/CD workflow by automatically triggering builds and deployments whenever changes are pushed to your repository. In this blog, we'll explore how to set up Jenkins to use GitHub Webhooks and show you how to trigger a build whenever a push event occurs. With this integration, you can save time and reduce errors by automating your CI/CD process.
We will do everything from scratch from creating an EC2 instance with the help of Terraform to installing and configuring Jenkins and docker on the server using Ansible.
This CI/CD pipeline will first build a docker image out of a dockerfile and then push it to the docker hub registry.
Prerequisites:-
AWS Account
Terraform
Ansible is installed on the local system.
Note: I have two repositories for this project one for creating the entire Jenkins server and one for the project from which we are going to create a Docker Image.
Creating Jenkins server using Terraform -
First, create main.tf file in the project directory
provider "aws" {
  region = "ap-south-1"
}

variable "vpc-cidr-block" {}
variable "subnet-cidr-block" {}
variable "availability_zone" {}
variable "env_prefix" {}
variable "ip-address" {}
variable "instance-type" {}
variable "public-key-path" {}

resource "aws_vpc" "myapp-vpc" {
  cidr_block = var.vpc-cidr-block
  tags = {
    Name = "${var.env_prefix}-vpc"
  }
}

resource "aws_subnet" "myapp-subnet" {
  vpc_id            = aws_vpc.myapp-vpc.id
  cidr_block        = var.subnet-cidr-block
  availability_zone = var.availability_zone
  tags = {
    Name = "${var.env_prefix}-subnet"
  }
}

resource "aws_internet_gateway" "myapp-internet-gateway" {
  vpc_id = aws_vpc.myapp-vpc.id
  tags = {
    Name = "${var.env_prefix}-internet-gateway"
  }
}

resource "aws_default_route_table" "main-route-table" {
  default_route_table_id = aws_vpc.myapp-vpc.default_route_table_id
  route {
    cidr_block = "0.0.0.0/0"
    gateway_id = aws_internet_gateway.myapp-internet-gateway.id
  }
  tags = {
    Name = "${var.env_prefix}-main-route-table"
  }
}

resource "aws_security_group" "Jenkins-security-group" {
  name   = "Jenkins-security-group"
  vpc_id = aws_vpc.myapp-vpc.id

  ingress {
    from_port   = 22
    to_port     = 22
    protocol    = "tcp"
    cidr_blocks = [var.ip-address]
  }

  ingress {
    from_port   = 8080
    to_port     = 8080
    protocol    = "tcp"
    cidr_blocks = ["0.0.0.0/0"]
  }

  egress {
    from_port       = 0
    to_port         = 0
    protocol        = "-1"
    cidr_blocks     = ["0.0.0.0/0"]
    prefix_list_ids = []
  }

  tags = {
    Name = "Jenkins-${var.env_prefix}-security-group"
  }
}

data "aws_ami" "ubuntu" {
  most_recent = true
  owners      = ["099720109477"]
  filter {
    name   = "name"
    values = ["ubuntu/images/hvm-ssd/ubuntu-focal-20.04-amd64-server-*"]
  }
  filter {
    name   = "virtualization-type"
    values = ["hvm"]
  }
}

output "aws-ami-id" {
  value = data.aws_ami.ubuntu.id
}

output "ec-2-public-ip" {
  value = aws_instance.myapp-server.public_ip
}

resource "aws_key_pair" "ssh-key" {
  key_name   = "server-key"
  public_key = file(var.public-key-path)
}

resource "aws_instance" "myapp-server" {
  ami           = data.aws_ami.ubuntu.id
  instance_type = var.instance-type

  subnet_id                   = aws_subnet.myapp-subnet.id
  vpc_security_group_ids      = [aws_security_group.Jenkins-security-group.id]
  availability_zone           = var.availability_zone
  associate_public_ip_address = true
  key_name                    = aws_key_pair.ssh-key.key_name

  # user_data = file("entry-script.sh")

  tags = {
    Name = "Jenkins-${var.env_prefix}-server"
  }
}

resource "null_resource" "update_hosts_file" {
  provisioner "local-exec" {
    command = "truncate -s 0 hosts && echo -n '${aws_instance.myapp-server.public_ip} ansible_user=ubuntu' >> hosts"
  }
}
I have already explained Infrastructure provisioning with terraform in this Blog.
Now apply these changes using
terraform apply -auto-approve
Configuring Jenkins Server using Ansible -
Create jenkins.yaml file inside the project folder
---
- name: Install Jenkins on Ubuntu Server
  hosts: all
  become: yes

  tasks:
  - name: Update apt cache
    apt:
      update_cache: yes

  - name: Install OpenJDK 11
    apt:
      name: openjdk-11-jdk
      state: present

  - name: Add Jenkins APT Key
    apt_key:
      url: https://pkg.jenkins.io/debian-stable/jenkins.io.key
      state: present

  - name: Add Jenkins APT Repository
    apt_repository:
      repo: deb https://pkg.jenkins.io/debian-stable binary/
      state: present

  - name: Install Jenkins
    apt:
      name: jenkins
      state: present

  - name: Start Jenkins Service
    service:
      name: jenkins
      state: started
First, we install Java JDK which is necessary for Jenkins. Then we add the official repository of Jenkins and install Jenkins on the instance.
---
- name: Install and configure Docker on Ubuntu
  hosts: all
  become: yes
  tasks:
  - name: Update package manager
    apt:
      update_cache: yes

  - name: Add Docker's official GPG key
    apt_key:
      url: https://download.docker.com/linux/ubuntu/gpg
      state: present

  - name: Add Docker's official repository
    apt_repository:
      repo: deb [arch=amd64] https://download.docker.com/linux/ubuntu {{ ansible_distribution_release }} stable
      state: present

  - name: Install pip
    apt:
      name: python3-pip
      state: present

  - name: Install docker module for python
    pip:
      name: docker

  - name: Install Docker CE
    apt:
      name: docker-ce
      state: present

  - name: Add current user to the Docker group
    shell: sudo usermod -a -G docker jenkins

  - name: Restart Jenkins
    service:
        name: jenkins
        state: restarted
Here also add the first official repository of Docker. Then we install python for the installation of docker. After installation, we must add a Jenkins user to the docker group so that we can execute docker commands.
Now let’s apply our playbooks, For that, we need to have a host file that contains the IP address of our server. That we have already done in terraform provisioning, so let’s apply changes
ansible-playbook -i hosts Ansible/jenkins.yaml
ansible-playbook -i hosts Ansible/docker.yaml
Here -i indicates inventory which contains the host address followed by a path to the yaml file.
Setting up Jenkins Server:-
After the successful execution of ansible, commands let’s access our jenkins server by using URL -
http://<External-IP-Address>:8080
This screen shows up -
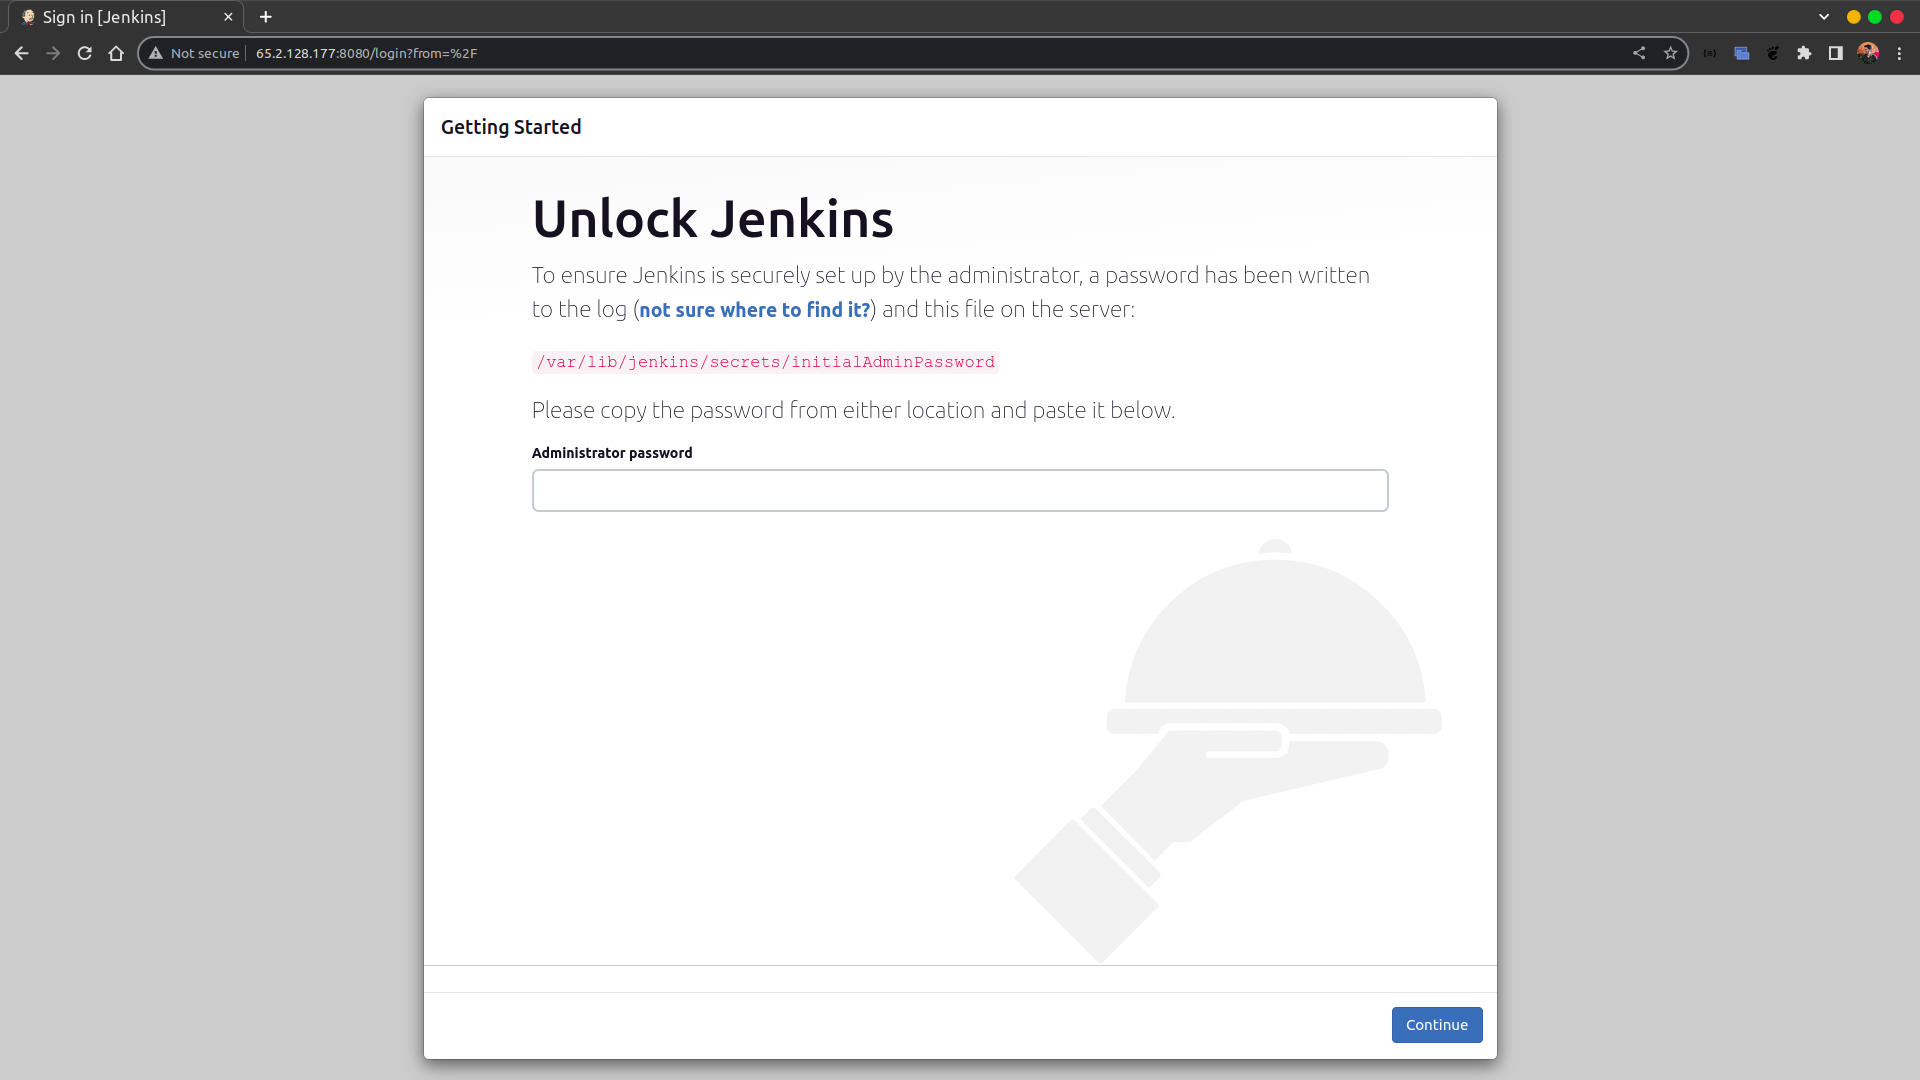
For the Jenkins password ssh into your Jenkins server using
ssh ubuntu@<External-IP-Address>
and run sudo cat /var/lib/jenkins/secrets/initialAdminPassword
Copy the output string and paste it in as a password. Now follow the normal Jenkins installation process.
GitHub Integration:-
For Github integration we first need to add our GitHub server to Jenkins, for that go to GitHub -> Settings -> Developer Settings -> Personal Access Token (Classic)
Click on generate a new token, give the name as Jenkins and copy that token as we need it in the future.
Now go to Jenkins server in Manage Jenkins -> Configure System
Scroll down to the GitHub section and click on Add Github Server.
Click on Add below the Credentials field. Select the kind as Secret text.
Enter the copied token in the Secret field and type Jenkins in the ID field and click on add. Now click on credentials you will see the option as Jenkins which we just created. You can also test the connection.
GitHub Webhook:-
To create and configure the Github webhook go to settings in your project repository. Click on the Webhooks section and click on add webhook.
Enter payload Url as - http://<External-IP>:8080/github-webhook/
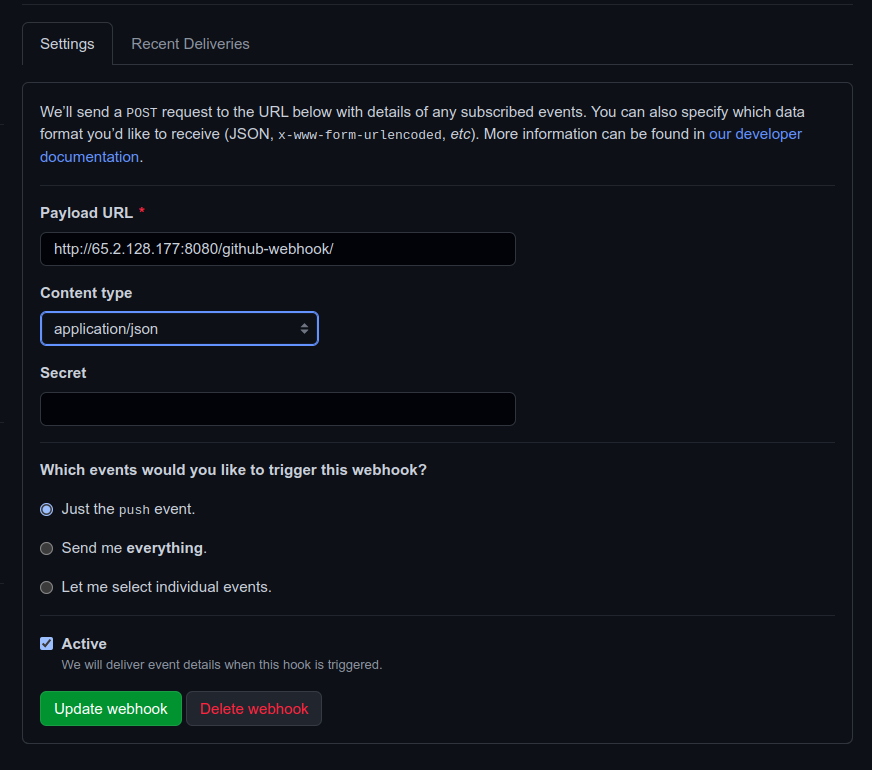
Click on add webhook.
Note: Make sure that GitHub shows a green check mark at the left side of your webhook that confirms that the URL is correct and working as expected.
Jenkins CI Pipeline:-
Create a new project in Jenkins, give it any name you want and select pipeline. Select the GitHub hook trigger for GITScm polling in the build trigger section.
In the pipeline section select Pipeline script from SCM and then select Git in the SCM section. Enter your repository URL in my case it’s going to be https://github.com/PranavMasekar/DevOps-Project/tree/DevOps.
Specify the branch and click on Save.
Now let’s prepare our Jenkinsfile to go to your project and create a Jenkins file -
pipeline {
  agent any
  environment {
    DOCKER_HUB_CREDENTIALS = credentials('docker-hub')
    DOCKER_IMAGE_NAME = 'pranav18vk/go-restro'
    DOCKER_IMAGE_TAG = "latest"
    DOCKER_REGISTRY_URL = 'https://index.docker.io/v1/'
  }
  stages {
    stage('Build Docker Image') {
      steps {
        script {
          sh "docker build -t ${DOCKER_IMAGE_NAME}:${DOCKER_IMAGE_TAG} ."
        }
      }
    }
    stage('Push Docker Image') {
      steps {
        script {
          withCredentials([usernamePassword(credentialsId: 'docker-hub', usernameVariable: 'DOCKER_HUB_CREDENTIALS_USR', passwordVariable: 'DOCKER_HUB_CREDENTIALS_PSW')]) {
            sh "echo ${DOCKER_HUB_CREDENTIALS_PSW} | docker login -u ${DOCKER_HUB_CREDENTIALS_USR} --password-stdin ${DOCKER_REGISTRY_URL}"
            sh "docker push ${DOCKER_IMAGE_NAME}:${DOCKER_IMAGE_TAG}"
          }
        }
      }
    }
  }
}
To push images to the docker hub we also need to set up the docker hub credentials in Jenkins. For that go to
Manage Jenkins -> Manage Credentials -> Click on global
Click on Add Credentials, and select Username with password in the kind section. Add the docker hub username and password in respective fields and give the ID as docker-hub.
Now commit your changes and push them to the GitHub repository and check whether the job has been triggered or not.
🤔🤔 Job has not been triggered ??
That’s because Jenkins doesn’t register the first triggered job via webhook. The first job should be triggered manually so click on the play button on the Jenkins dashboard page. Check whether the pipeline is working correctly or not.
After the first manual build do another push to the repository and this time Jenkins job will be triggered.
Congratulations 🥳🥳 on completing this hands-on tutorial on setting up Jenkins with GitHub Webhooks to trigger a job on push events! By following the steps outlined in this blog, you have learned how to automate your CI/CD workflow and streamline your software development process. Keep exploring the many powerful features of Jenkins and GitHub to continue improving your development workflow, and happy coding!
GitHub link for Jenkins Server.
GitHub link for Project.


